Sunday, June 24, 2018

Replace Rear Wheel Bearings, 2008 Dodge Challenger SRT8

Greetings!

Alright, 2008 Dodge Challenger SRT8, rear wheel bearing hubs.  So the tire guy told you the bearings are shot, eh?  Yeah, that'll happen.  And he gave you a big quote to replace them??  I know that feeling....

My usual disclaimer, do not attempt anything I show here.  This is for entertainment purposes only.  I cannot & will not be responsible for anything you do.

Difficulty level.  I have done front wheel bearing hubs on GM full size 4wd pickups a few times.  Silverado, Tahoe-Yukon-Escalade type stuff....  This is harder.  So, do an honest assessment of your mechanical ability, and go from there....

Now then, let's begin.


A word about parts, first.  Prices are literally all over the map for these bearings.  $59 for the pair, all the way to $249 each.  I would try to go with something good.  SKF or Timken.   I got these at NAPA obviously.  I am not sponsored by NAPA, nor am I endorsing NAPA.  This happens to be what I got.  I think they were around $140 each. 

Also, the lug nuts, on this car, have like a "wrapper" of metal, over them.  Which can get loose.  So I had a problem with one, and, I was advised to replace them all.  NAPA sells a solid metal replacement lug nut for like $6 apiece.   Which sounds like a lot, but I see while I wasn't looking, the tire place ruined one too, and there it was on the bill, $15 for a replacement....  Anyways, if your car is older, plan on 10 of those too.  As long as you're gonna have the wheels off, you may as well replace them.  You would hate to have a flat, in the middle of nowhere, and have a lug nut problem....  But that's up to you.


Alright, let's assume you can jack up the car, remove the lug nuts, and get the wheel off.  If you can't, I guess you have to look somewhere else for that info, but that info should be very readily available....  So the picture above is, wheel off, car lifted, ready to begin.


Step one is to get the brake caliper off.  Those 2 bolts are on the back...  18mm I think, if I remember.  Crank those off, remove the brake caliper.  Don't let it just hang from the brake line.  Tie it up to something...  Or I just put it on a little supporting box next to the brake rotor.

Now you should be able to pull the brake rotor off....


Now we're removing the center hub nut.  This will be on real tight.  32mm. 


You can blast it off with one of these, or use air tools, or get a big 1/2 inch breaker bar, and crank it off....

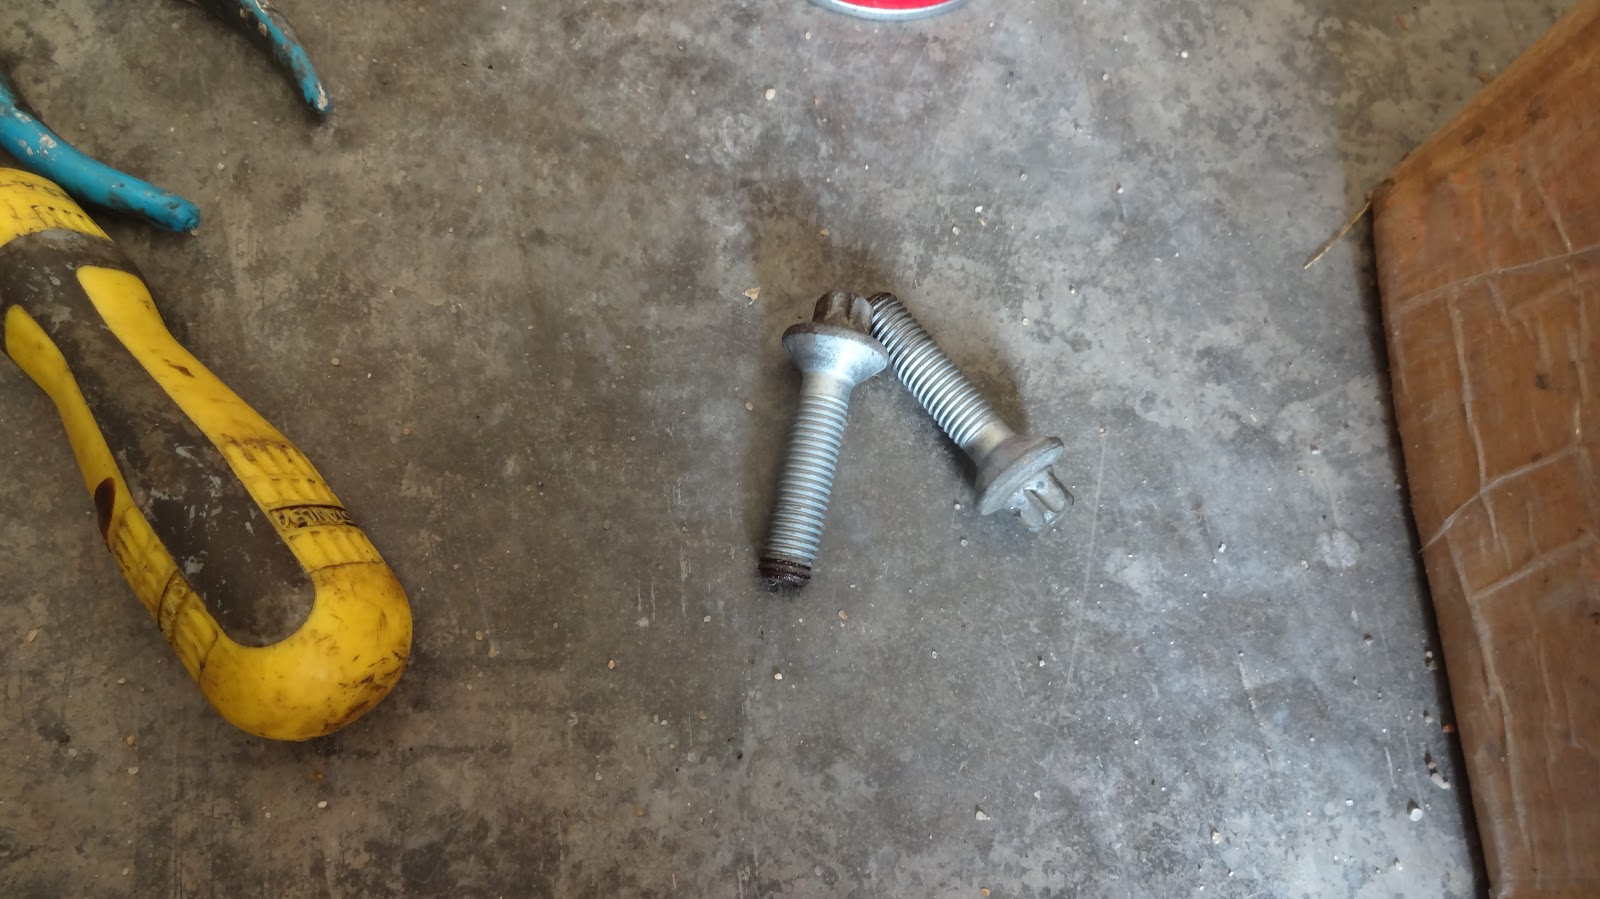
Now things start to get tricky....  These trailing arm (or A-arm) deals, the bolts have to come off.  You need the hub to wiggle around and move a little, to give enough room to get the 4 bolts out of the back....


Those 2 there, have to come out.  I'm looking from the top down.  It's all 18mm.  You will have to cranks them out with back to back wrenches....


Like so.  Now, that stuff is under pressure.  It will jump & move when you finally get the bolt out.  And, take plenty of pictures as you disassemble, so you get how the bolt was, how the arms come together...  Everything.  By the time you are ready to reassemble, your will to live may be gone, and, you may be slightly unclear in your mind how this goes back together, so, pictures....

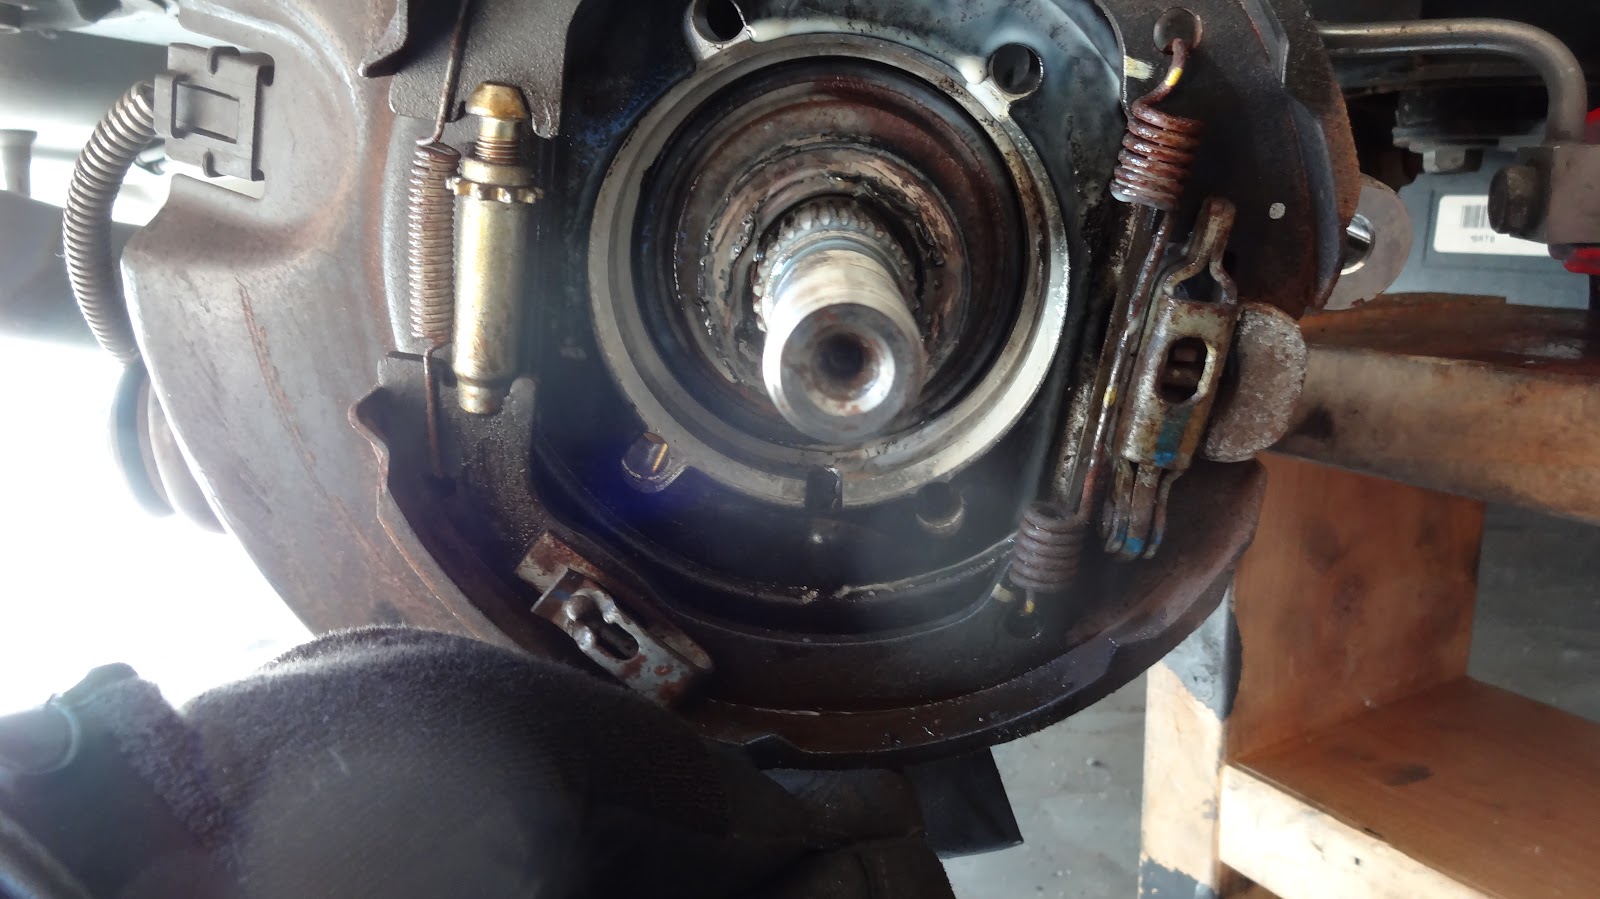
We need the hub to have some wiggle room, because we have to get BEHIND the CV axle half shaft, and remove 4 bolts....  The whole point of this is so we can wiggle the axle out of the way, and get the bolts out of the backside of the hub....


This bolt here, picture above, is on the rear of the hub.  LOOSEN this one, but do not remove it.  It's real hard to get these back in, and if you remove THIS one, the whole hub will move so much, that it just is super hard to reassemble the whole thing....  So, just loosen.  Then you can just re-tighten later....

With that stuff off, now it's time to go after the 4 bolts on the back of the hub.  Yeah.  This is not going to be fun.


As seen above, what I did was, PUSH the CV axle IN.  Towards the center of the car.  You need the bulbous end of the CV Axle to move AWAY from those bolts, and give you some room, to get the bolts out....


The photography is not great here, I apologize, but here it is, as seen above, with the axle pushed it, you can see the head of the bolt.  Yes, that is some kind of weird reverse torx.  6 pointed star thing.  Classic Mercedes trick.  Some of you may recall, it was Daimler Chrysler back then, so some of this stuff is from the MB playbook....

Uhh, also, see below, with the hub removed, the pictures are much clearer, of WHERE these bolts are, relative to the hub, and what you're looking at, and where you should be looking....


You will need an E14 socket, as seen above, to remove those.  You probably don't have it, so order that before you do this.

Note!  I am told, some RT's, or some V6's, might have E12 bolts???  I do not know, I don't have 3 other cars here to stare & compare with....  So do your research on that, if your car is not an SRT8.  I was also told that RT's and V6's had smaller "ends" on the CV axles, which makes this job easier....  I have no way of knowing.

I got a set of those sockets for 20- some odd American dollars on Amazon, so...  Not the end of the world.


Setups like you see above, is how I got the bolts out.   You're gonna have to do what you have to do to get them out.  There is NOT a lot of room....  You gotta push on the axle while you do this...  Obviously a hoist would be easier, but I'm sitting on a garage floor....


Something like this might get a couple of them....

Uhhh, also, I was warned that the reverse torx, that E14, LOVES to strip, so make DARN SURE that your socket is DOWN hard and tight and flat over that bolt head....  DO NOT STRIP THAT!  I am told that Dodge Dealers don't stock them, so, you'll be waiting, for replacements...  And, I have no clue how you'd get it out, once you strip it...  I was very careful, and had no problems or scary moments....  Just be aware, don't strip those....


There's another one we're trying to get....  So much fun.  You're going to be using the braille method on these for the most part....  Just getting the pictures was no picnic....


Hey!  We got 2 out.  2 more to go....


If you stick with it, and keep working...  You will get to this point.  All bolts out, hub removed....  Hahah!  Success....

Uhhh, now we need to install the new one....


Now, this is important.  This will only fit ONE WAY.  Those bolt holes, they are a little narrower on one end, than on the other end.  Also, when you're trying to remove those bolts, these pictures might help visualize where they are....  But do a real good stare & compare here, and make sure your bolt pattern is going on the right way....

As you re-install, try to START all 4 bolts....  After all 4 are in and hand threaded on somewhat, THEN tighten them all down....


Amazing.  The 4 bolts are in & tight.  You may have lost your will to live by this point, but, pull yourself together, we have some more work to do....  That is a nice sight though.... Progress!  We're getting there!!!


Now we gotta get these suspension components bolted back together....  Yeah, I know, the fun never ends....


If you bring in a second jack, and jack up the hub, it will help A LOT to do this....  I'm not sure it's even possible, without jacking up the hub, so, have a second jack handy for this....


So, with the hub jacked up, I got the "lower" one on, the one at an angle.  Don't tighten that!  Get all the bolts IN, and THEN go back and tighten everything....

This next one, here's my process for getting these on...  Not sure if it's according to hoyle, but...

Get the bolt through the hole, sticking out some.  Like you see below.


With some grunting, swearing, and sweating, move that arm down, and try to get it over the end of that bolt....  Like you see in the picture below...


Use a ratchet to crank the bolt through (it will be under pressure, so you can't spin it)...  Crank that in until the bolt is exposed on the far end, and spin a nut on it....


Once they are all in, now go back and tighten all the suspension arm bolts you loosened...  Don't forget that rear one we loosened, but didn't take off....


Wow....  Will you look at that....  Never thought we'd get to this point, did you....  Hahaha!  Yeah, me neither....  Okay, seriously, the worst is over.  A few more things, we'll wrap this up.....


Remember that axle nut???  Yeah, don't forget that.  Spin that on and hammer it down...


DON'T rely on your tool to get final tightness.   Get the big torque wrench out.  This nut is supposed to be 165-170 ft pounds, something like that...  Again, do your due diligence on that for your car, there may be differences....  Make sure that nut is cranked on though.  You don't wanna be having those kind of doubts while you're flying down the freeway....


Get your brake rotor back on, and install your brake caliper back on there....


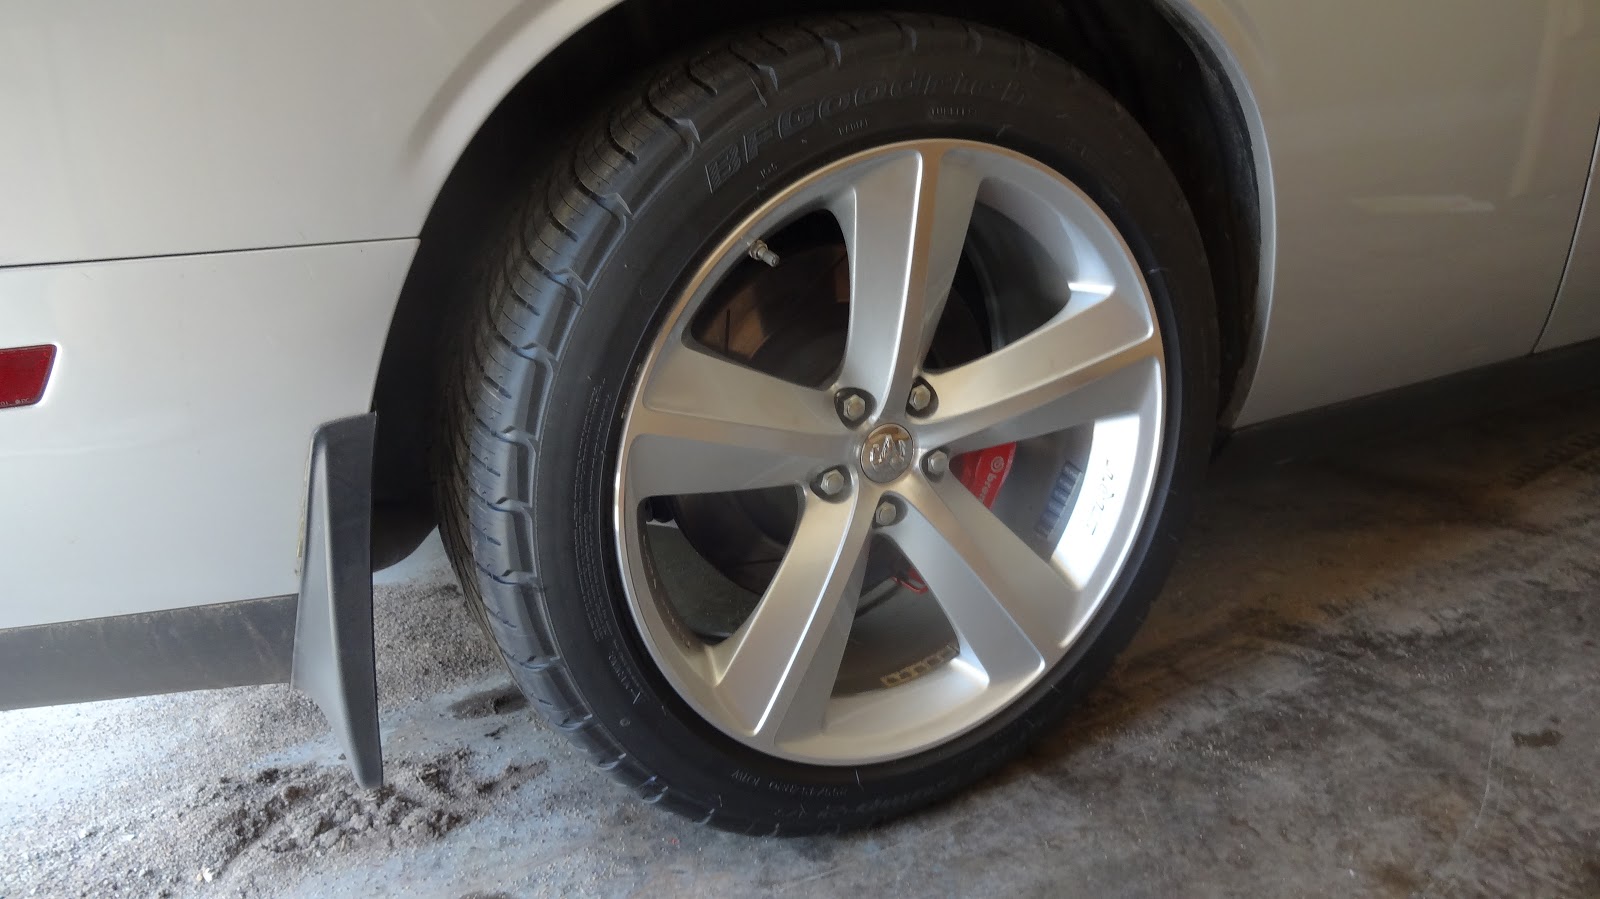
Yes, and finally, get your wheel and tire back on.  Lug nuts on this are 110 ft pounds.  I am told RT's and V6's are 100 ft pounds, so, do your research on that.

And you are done!

This is not easy.  I can easily do both fronts on a GM truck in 4 or 5 hours??  Guessing?  Took me 8 hours to do the first one...  These pictures are from the second one, probably 6 hours.    This job is no joke.  So, assess your abilities honestly, before you take this on.

I feel that bearings should be done in pairs, but again, that is my opinion.... 

Also, this is a summer car for me, so, there is minimal rust, practically no rust.  If you are daily driving yours through the snow, rust could greatly enhance the difficulty. 

If you attempt this, good luck to you.


Saturday, June 13, 2015

Mileage Test for Chris Fix, MAXX Fuel Supplement

Hey, greetings!

These are my results, for the Mileage Test, for Chris Fix.

Chris Fix is a Youtube presenter, with his own channel... He does a lot of car repair videos.  His videos are very good, amongst the best that I have seen out there.    So, Check out Chris Fix on Youtube when you have a chance!  You will NOT be disappointed!  I encourage you to SUBSCRIBE to Chris Fix on Youtube.

Alright, let's get started...

We are testing MAXX Fuel Supplement:


Lots of interesting claims on that bottle.  Sounds like a miracle, doesn't it???  It should.  It costs $20 a bottle. We'll come back to that later....

Now, Particulars on the car I drove, for this test:
2008 Dodge Challenger SRT8
First Edition
6.1 Liter Hemi V8, Premium Recommended
(Premium Gas from Mobil was used entirely for this test)
70,000 miles on the car.
Mobil One 0w40 full synthetic motor oil, Factory Recommended fill, changed 900 miles ago.
For the record, the car is running fantastic right now.  Starts, plenty of power, runs strong, no codes, no MIL lamps, nothing.


Just for a laugh, that is my average MPG right now.  Probably hasn't been reset in at least a year.  This car loves gas.  This is not a mileage machine at all.  My Escalade gets roughly the same mileage.   To be honest, my C5 Corvette routinely got 25 mpg.  I had several Cadillac Eldorado's, those routinely were in the 23 to 25 mpg range.  So, if you are looking for mileage, this is not the car for you.

Also, my driving is plenty spirited.  Maybe I should tone it down on the burnouts, and the launches when the light turns green......

That's just a point of reference, for what we will see during this test.

Methodology for this test:

Okay, the test:

1. Fill up the tank with Mobil Premium Unleaded.
2. Drive a 75 mile loop, mostly freeway, with some city.
3. Return to the same Mobil, make observations.
4. Add 2 ounces of MAXX fuel treatment.  Now, the bottle says 1 ounce, for 30 gallons, but that seems like, such a microscopic concentration...  I'm adding 2 ounces.  Leave your complaints in the comments, I will ignore them completely.
5. Refill tank.  Now, whatever THIS fill requires, is what we BURNED running loop 1, correct?  Correct!  Also, I refilled at the exact same pump, so, any question of  "diffferences in gas" should be discarded.  Also, I did this all on the same morning, so, temperature, air pressure, weather, or other extraneous factors should be minimized.
6. Drive the identical loop again.
7. Return to the same Mobil Station.  Make observations.  Refill tank.  Again, what it takes, to refill the tank, should be what we burned on Loop 2.
8. Analyze results.

Alright, let's get started.


Here we are (picture above), starting out, at Mobil, full tank, all counters in vehicle are reset to zero, as you see....  and off we go!

And, yes, In June, in Wisconsin, it's 62, cloudy, drizzling.....  I'm not sure why anyone lives here, to be honest....


Attempting to cruise on the freeway...  I thought traffic would be light, this morning, but the world is full of people who set their alarm, got up early filled up their crappy minivan with whatever, and got out on the highway.  The gas pedal must be nearly impossible to find in those things....  Can't even maintain 65... Sigh.   I don't have the kind of "pull" in my commmunity, where I can ask for 35 miles of freeway to be shut down, so, I guess we get what we get....

Okay, Loop One complete....  What do we see?

74.1 miles, 21.9 mpg, is what that says, below...  Not bad!  I'm not gonna lie, that's better than I expected.  that was with no additive.  Just Premium gas, which I always run, every fill-up, every time.


Now, I added 2 ounces of MAXX, refilled the tank, and headed back out on the road, to drive the IDENTICAL loop again.  Same route.  Starting & ending at the same gas station, same pump, same everything.  Let's get started....  Also, it goes without saying, but obviously all counters were again reset, avg MPG, trip odometer, all that stuff....


All this driving did give me a chance to play with this stereo....  It has a hard drive built into it, so, over the winter, I spent a few hours loading a pile of music into it.  I put in like 24 hours of music, and that nowhere near filled it, so, it holds a lot.  Sounds great, and it actually worked....  Nice.  Very clumsy to LOAD the music, sitting in the garage for hours, but once it's in, it's nice...  Ahem, anyways, back to the test...


Oddly, traffic was a little less on the second loop....  I was cruising comfortably for a lot of it....


And, we're back!   As you see above, 74.1 miles again, but this time, 22.4 mpg....  Hmmm???

Did MAXX really work???

Well, lets break it down:

Loop One:
Dashboard states: 21.9 MPG
Trip: 74.1
Fuel added at pump: 3.38 gallons
(Calculated) Observed MPG: 21.9

Loop Two:
Dashboard states: 22.4 MPG
Trip: 74.1
Fuel Added at pump: 3.33 gallons
(Calculated) Observed MPG: 22.2

If we believe the Dashboard, we got a little over 2% better mileage.
If we believe the actual fuel added at the pump, which I am inclined to take more seriously, we got 1.5% better mileage.

To be honest, I am MORE inclined to believe the ACTUAL gas put in, rather than the "dashboard" number, which, while it comes from the computer in the car, is really a mathematical algorithm, based on throttle position, rpms, and other factors.... it is not "measuring" the fuel though, in any real sense....  It gets you CLOSE, though, and, I think it is close....  Those numbers are pretty much right there...  Very close.

Now, let's not kid ourselves.  These are SMALL differences.  SMALL.  How small?

Real world:  If I poured in MAXX Fuel supplement, jumped in that car RIGHT NOW, and drove 1500 miles, to see my Dad, in South West Florida, how much gas would I save???  BARELY 1 GALLON!!  Keep in mind, The bottle of MAXX costs $20.  1 gallon of Premium, today, costs $3.39, where I live....  You figure it out.

Yeah.  Look, this is SUCH a small difference....

I personally, for me, I see no difference.  To me, the 1.5% is within the range of "rounding error" or what have you...  The slight difference in traffic could have caused that...

My personal conclusion is, if you are looking for MILEAGE GAINS, MAXX is not for you.  I tried to conduct a very fair test, and I tried to control for variables, and keep everything even steven.  And, to be totally fair, there was a gain.  A small gain.

Now, again, to be fair, I am doing this for Chris Fix.  So, I will let him gather all his data, from his Youtube Subscribers, and, in the coming weeks, you can see what conclusions he draws.  HIS conclusions would obviously be based on a LOT more data.  Maybe other people will see more gains.  Who knows.  I will be watching and waiting to see what he finds out.

Now, I already have this bottle, and I intend to try it in my Harley.  I would not be looking for mileage though...  My bike runs a LOT better, stronger, smoother, with Lucas Fuel Treatment added to it.  So, I might try the MAXX in that, to see what happens, but, I use additives there strictly for performance and driveability....

Anyways, thanks for reading.  I encourage you to subscribe to CHRIS FIX on Youtube!


Thursday, April 2, 2015

How To Clean a Remington 1100/11-87 Shotgun

Alright, today we're going to DEMONSTRATE how to disassemble and clean a Remington 1100 or 11-87 shotgun.

Demonstration purposes only!!!  Do not attempt!


Firearms should be serviced and repaired by a competent gunsmith!


You've been warned.  I cannot and will not be responsible for what you do on your own....

So, for demonstration purposes only, let's get started.

For this demonstration, we will be using a Remington 11-87 Premier Trap 12 gauge semi-auto shotgun.  There may be differences, between your 1100 or 11-87, and what you see here.  Most will be similar, but...  Always consult your Owners Manual for the particulars.  If you do not have an owners manual, PDF's are online, or you can write to the Remington Arms Company, and they will provide one.

Here's our shotgun.  Delightful Bird-Breaking device.


Step One: Empty Gun!  Safety!  Empty gun!  Empty empty empty!  No ammunition should be present!


Starting off, we have the nut, on the end of the forehand.  By the way, this should be checked occasionally, during a sporting Clays or Trap session, to make sure it stays tight.  Sometimes they start to get loose, with a lot of shooting.


Turn that nut counter-clockwise.  You should be able to do this by hand.  It may be tight, but it should come off without tools.


Nut is off.  Like so.  No problem.  Wipe that off with some CLP.


For reference, I use CLP for everything.  So, if I use the term "gun Oil", or whatever, I'm talking about this.  There are other brands of CLP, these are all very available in the cleaning supplies area of your local sporting goods shop.  I am not endorsing any particular product... this happens to be the one I like and I use.  If you prefer something else, that's up to you.


Now, with the nut off, the forehand will slide up & off...


And this funny "top cap" part will be on top of the "stack" of parts on the magazine tube....

That sometimes is not there...  I'm not sure why or why not.  If you have this part. obviously, take note of how it is sitting there, remove it, clean it up, and during re-assembly, replace it the way you found it.


Now it's time to remove the barrel.  I would suggest, grasping the receiver of the shotgun firmly in one hand, and the barrel in the other hand, and start pulling.  The barrel will pull straight out of the action.  You may have to combine some pulling with some wiggling of the barrel.  Some of these are really tight.  Some will come right out.  You SHOULD be able to work it out, with just hand pressure.  Stay patient.  Take your time.  You will get it apart.


Like so.  Barrel is off.  In this picture, you can kind of see what you're trying to do.  That ring on the barrel goes over the silver magazine tube.  So it must come off on that line, straight off.....  Set the barrel aside for now...


Okay, barrel is off.   Now we want to get that little spur out of the bolt, the silver part inside the receiver.  This is on a spring loaded detent, so you can just firmly pull it straight out, and it will come out.


Like so.  Pull it straight out.


Now, we want to slide the carrier and the bolt out of the receiver.  This is real hard to photograph by yourself, but, with the right hand, as you see in the pic above, put your index finger up & inside, through the mag loading area.  On the inside of the receiver, there is a springy part you will feel with your finger.   This keeps the bolt & carrier in place during normal firing.  To get this apart, PUSH THAT IN, towards the wall of the receiver, and THEN slide the assembly forward....

It sounds trickier than it is.  Push the thing, slide the carrier forward by grasping it up on the magazine tube.

I know what you're saying, "my right finger is in the way!"  You'll be okay.  When it starts to slide over that springy part, and it clearly is more "forward" than it usually is, you can let go, and the carrier & bolt will slide totally out, and can be removed....


Okay, so it slid forward.  Your silver bolt can just be taken off the carrier....  Riding around inside the receiver, it is "trapped" on the carrier.  Once it's out, it will just fall in your hand, if you're not careful, so grab that.

On the end of the mag tube, you see a little O-Ring.  CAREFULLY remove that.  Use caution, going over the threads for the cap.  Obviously, replacement O-Rings are available, if you mess it up.  And, you may find it's damaged already.  Any wear or damage, it should be replaced.  Your shotgun will not cycle properly without this O-Ring.   They do wear out.   Some people seem to go a lifetime without every ruining one of these, and some need a new one every year...  Use a little caution, it should last quite awhile.


Here you can see, the O-Ring is off.  and the bolt is there, on our pad.  Now we have the piston ring thing there, that must also come off....


Like so.  Out be the threads, is the ring.  TAKE NOTE of how that is aligned.  It fits ONE WAY.   Take a digital pic if you have to, to refer back to later.    Slide that off the end of the tube.  It should come off pretty easy.


Okay, everything is off.  NOW, we can finally pull the action carrier off the magazine tube.


Like so.  The bolt, as you noticed, sits in that shelf on the left side of the carrier....


Taking a closer look at that piston ring.  Spray this heavily with Break Free, and then wipe it clean.  Repeat a couple times if necessary.  That part can get dirty.  That ring, the carrier, these are the moving parts of the gas system that makes this semi-auto shotgun work properly.  It "taps off" high pressure gasses behind your shot load, and uses that gas pressure to operate the action.  So, that gas is hot, and has powder combustion by products in it, which will pile up and be dirty...


This part of the mag tube here, this is the dirt from the hot gasses....   Spray that heavily with CLP, soak it, and then wipe off the dirt.  Repeat a few times if necessary.  You should be able to get this part very clean, which is ideal.


Like so.  Nice and clean.   Uhh, note to viewers, naturally, this is a DEMONSTRATION, you are not doing this....  But you especially are not doing this in your kitchen.  The lighting in my kitchen is WAY better than my garage, so for picture purposes, it photographs way better in the kitchen...  so, for you, the viewer, to help you see what's going on, I'm doing this in my kitchen ONE TIME, just to demonstrate.....


Okay, let's wipe down the inside & outside of the receiver, as we see above.  This should be nice & clean when you're done...


Here's your bolt.  That may be pretty dirty....  Hose that off with CLP, and then start wiping...  Keep going to clean cloths, if necessary....  Re-hose it with CLP, if necessary....  You should be able to get this really clean.


This thing in the top will flip up & out, that will help you get it really clean....


This is the front of the bolt.  The firing pin hole should be clean & free of obstruction.  The firing pin itself should move smoothly & easily, you can operate that with your finger.  The spring around the firing pin should be intact.  If that spring breaks, the gun won't work, so take a look at that, make sure it looks good.  Also, on the left of the bolt,  in the above picture, that is the extractor.  This has to work, to pull the spent shell out of the chamber.  That should be real clean, it should move smooth against the spring.  That's important.  The extractor should not be broken, or cracked, or have any defects.  To spend a minute on that.  If your shotgun is working perfectly, get a good impression in your mind of how it looks, and how it works.  A bad extractor will cause all kinds of problems.


Moving on, here's our bolt carrier...  Hose this down with CLP, and wipe it down.  This might be pretty dirty.


Some of these shotguns have this sticker, that shows the orientation of that piston ring we removed earlier.  Most do not.  So, don't depend on that being there.  But if it is, that's kind of nice....


The inside of this sleeve tube on the carrier should be really clean.  Spray that down, roll up a cloth or something, get it in there, and spin it around...  You'll probably have to do that a few times....  Get it CLEAN in there.  This part has to move against the magazine tube, back & forth, on every shot, so you want this to be smooth running....  No binding, no hanging up, no nothing.  It should move smooth.  So get it clean, and then lightly oil the inside when you're done.


Like so.  Nice clean puppy.  The inside should be very smooth and nice.  If there is scratching, gouges, defects, rust, or other problems in there, your shotgun may not work properly.  So pay attention to that.


Taking another look at that piston ring...  Make sure that's clean...  As you can see, there's plenty of slime on that....


That's better.  Now, this might not get bright & shiny....  It's under a lot of heat and pressure.  As you keep cleaning though, the black stuff should STOP coming off of it....


Okay, we set the barrel aside before.  Let's get the barrel, and get started.  If you have choke tubes, this isn't a bad time to inspect, and make sure they are good.  I'm using a choke tube wrench there, to remove the tube.

In any firearm, the muzzle is very important to your accuracy!  So, use caution here.  The way the shot load exits this muzzle is critical to your accuracy, and the perfection of your shot pattern.  So use this tool carefully!  Hand pressure only!   don't mess up the tiny fine threads on this!  Take your time, and use caution.  This is important!

Also, these tubes tend to get loose during firing, so if you're doing a bunch of shooting, check your tube occasionally to make sure it's tight.


There's our tube.  Looks good.  Reinstall.  Also note, with "overbored" barrels and differences in choke tubes, what was a "Super Full Trap" choke back in the 1970's, is not necessarily what this tube will produce.  This tube here, patterns this gun much like a "traditional" full choke shotgun.  So, as always, if you are in doubt, pattern your shotgun.  Find out what it's really doing.


Okay, the first thing we're going to do is hose down this cup area here, on the barrel.  And wipe out the dirt.  This will be dirty, as you can see, that was one quick wipe, and there's coal black carbon deposits in there.   You're going to have to do this a few times.  This is where the gas comes from, to operate the action....


See those 2 holes?  That's where the gas comes from.  Those holes should be clean.  If they are plugged, your shotgun won't work.   You can try to clean those out, if necessary, with a paperclip, or a small piece of wire, but work gently, and carefully.  You just want to clean stuck dirt out, you don't want to deform or damage anything.  The size & shape of those holes is critical.   Try blasting & flushing with CLP first, before you get out the paperclip....  You can probably get them cleaned out with just flushing....

I have seen some of these shotguns that, after neglect, had HEAVY carbon build up in this area.  If you can't get it, you might want to take the barrel to a gunsmith, and have him/her look at it.  If you screw this up, you'll end up buying a new barrel....


You can obviously use any number of cleaning rod type of things, to clean out your barrel.  At the moment, I don't have my rod, so I will show a BoreSnake concept here, which actually works fine, and is easy too.

First, as you see above, I cut a slit in the center of a patch, and slide it down the string of a boresnake.  Then, I soak the patch with CLP.  Soak it!

I also blast down the barrel with the spray can of CLP.  Soak it.  CLP should be running out the other end.


As always, a firearm, if possible, should be cleaned FROM THE CHAMBER, GOING TOWARDS THE MUZZLE.  So, put your string in the chamber, and let it fall out the muzzle.   I am going to pull it from chamber to muzzle.  Same direction as the shot goes, right?  Right.  That's what we want.


Pull the snake through 2 or 3 times.  Put a fresh patch on it each time, it will come out dirty.


After 3 or 4 times,  You should see what we have here.  Perfectly clean barrel.  Looks fantastic.  The pictures are hard to get, of this, but you will know it when you see it.  Shiny.  Clean.  No funny dark spots, streaks, or defects of any kind.

Obviously, you could use a rod, and a brush, and patches, and do the same thing.   I put a patch on a brush, soak it, push it through, fresh patch, soak it, push it through....  do that over & over, until you see what you want.


Congrats!  There's all your pieces....  All clean.  A thing of beauty, isn't it?  It is....

Now, how are we gonna get that back together???

Here we go:


Okay, let's get the Receiver, the bolt carrier slide action, the bolt, the O-ring, and the little handle that goes in the bolt.  Start by sliding the bolt carrier over the magazine tube, like so.  The part that holds the bolt should be towards the receiver.


Like so.

Put the bolt on there.  It will drop right on.  Don't let it fall off.  Now, you can grab the bolt carrier by the forward portion, and push it back into the receiver.  You might have to wiggle it around a little, to get it to go in.  Don't force anything.  It should go.  Play around with it gently, until it goes in.


Like so.  There it goes....

Once it starts going, slide it all the way back, and it will lock back, just like it usually does, when you are shooting it.


If you want to move it forward, you can press up on the bottom, the shell loading tube gate, and the action will release forward....


It will stop, without going too far forward, since you are NOT pressing that little tab inside with your right hand...  As you can see, I put the little handle back in the bolt.  You should be able to see the space, where it fits.  Just like removal, to install, get it in place, and firmly push it in.   It should go.  You don't need a hammer or anything....


Now, slide your piston ring over the tube.  Make sure it's oriented the right way!  Refer back to the pictures of when you took it off, if you have to.


Slide that all the way down.


Now the O-Ring.  Again, careful going over those threads!  Gently!  Take your time!  The Trap Range is closed anyways, so relax, and just gently slide that down.


The O-ring should go all the way down, and into the "depression" there in the magazine tube.  Like you see above.


Now, we're going to put the barrel back on.  Slide the ring over the mag tube, and get the "action" portion lined up with the receiver....  The picture above shows the barrel, ready to be pushed into place.   From here, you just wiggle it a little, and push down.  Some of these go on real easy, and some are super tight.  Patience!  Just keep working it down, until the barrel meets the receiver....


Like so.  All the way on!  Starting to look like a shotgun again!


Now drop the circular capping thing over the end.... Like so.


Now you can slide your forehand back into place....


There it is, all the way down.... Nice!


And... Re Install your barrel nut!

And you're done!

Lucky that was just a demonstration....  Otherwise you might be tired right now!