Alright, today we're going to DEMONSTRATE how to disassemble and clean a Remington 1100 or 11-87 shotgun.
Demonstration purposes only!!! Do not attempt!
Firearms should be serviced and repaired by a competent gunsmith!
You've been warned. I cannot and will not be responsible for what you do on your own....
So, for demonstration purposes only, let's get started.
For this demonstration, we will be using a Remington 11-87 Premier Trap 12 gauge semi-auto shotgun. There may be differences, between your 1100 or 11-87, and what you see here. Most will be similar, but... Always consult your Owners Manual for the particulars. If you do not have an owners manual, PDF's are online, or you can write to the Remington Arms Company, and they will provide one.
Here's our shotgun. Delightful Bird-Breaking device.
Step One: Empty Gun! Safety! Empty gun! Empty empty empty! No ammunition should be present!
Starting off, we have the nut, on the end of the forehand. By the way, this should be checked occasionally, during a sporting Clays or Trap session, to make sure it stays tight. Sometimes they start to get loose, with a lot of shooting.
Turn that nut counter-clockwise. You should be able to do this by hand. It may be tight, but it should come off without tools.
Nut is off. Like so. No problem. Wipe that off with some CLP.
For reference, I use CLP for everything. So, if I use the term "gun Oil", or whatever, I'm talking about this. There are other brands of CLP, these are all very available in the cleaning supplies area of your local sporting goods shop. I am not endorsing any particular product... this happens to be the one I like and I use. If you prefer something else, that's up to you.
Now, with the nut off, the forehand will slide up & off...
And this funny "top cap" part will be on top of the "stack" of parts on the magazine tube....
That sometimes is not there... I'm not sure why or why not. If you have this part. obviously, take note of how it is sitting there, remove it, clean it up, and during re-assembly, replace it the way you found it.
Now it's time to remove the barrel. I would suggest, grasping the receiver of the shotgun firmly in one hand, and the barrel in the other hand, and start pulling. The barrel will pull straight out of the action. You may have to combine some pulling with some wiggling of the barrel. Some of these are really tight. Some will come right out. You SHOULD be able to work it out, with just hand pressure. Stay patient. Take your time. You will get it apart.
Like so. Barrel is off. In this picture, you can kind of see what you're trying to do. That ring on the barrel goes over the silver magazine tube. So it must come off on that line, straight off..... Set the barrel aside for now...
Okay, barrel is off. Now we want to get that little spur out of the bolt, the silver part inside the receiver. This is on a spring loaded detent, so you can just firmly pull it straight out, and it will come out.
Like so. Pull it straight out.
Now, we want to slide the carrier and the bolt out of the receiver. This is real hard to photograph by yourself, but, with the right hand, as you see in the pic above, put your index finger up & inside, through the mag loading area. On the inside of the receiver, there is a springy part you will feel with your finger. This keeps the bolt & carrier in place during normal firing. To get this apart, PUSH THAT IN, towards the wall of the receiver, and THEN slide the assembly forward....
It sounds trickier than it is. Push the thing, slide the carrier forward by grasping it up on the magazine tube.
I know what you're saying, "my right finger is in the way!" You'll be okay. When it starts to slide over that springy part, and it clearly is more "forward" than it usually is, you can let go, and the carrier & bolt will slide totally out, and can be removed....
Okay, so it slid forward. Your silver bolt can just be taken off the carrier.... Riding around inside the receiver, it is "trapped" on the carrier. Once it's out, it will just fall in your hand, if you're not careful, so grab that.
On the end of the mag tube, you see a little O-Ring. CAREFULLY remove that. Use caution, going over the threads for the cap. Obviously, replacement O-Rings are available, if you mess it up. And, you may find it's damaged already. Any wear or damage, it should be replaced. Your shotgun will not cycle properly without this O-Ring. They do wear out. Some people seem to go a lifetime without every ruining one of these, and some need a new one every year... Use a little caution, it should last quite awhile.
Here you can see, the O-Ring is off. and the bolt is there, on our pad. Now we have the piston ring thing there, that must also come off....
Like so. Out be the threads, is the ring. TAKE NOTE of how that is aligned. It fits ONE WAY. Take a digital pic if you have to, to refer back to later. Slide that off the end of the tube. It should come off pretty easy.
Okay, everything is off. NOW, we can finally pull the action carrier off the magazine tube.
Like so. The bolt, as you noticed, sits in that shelf on the left side of the carrier....
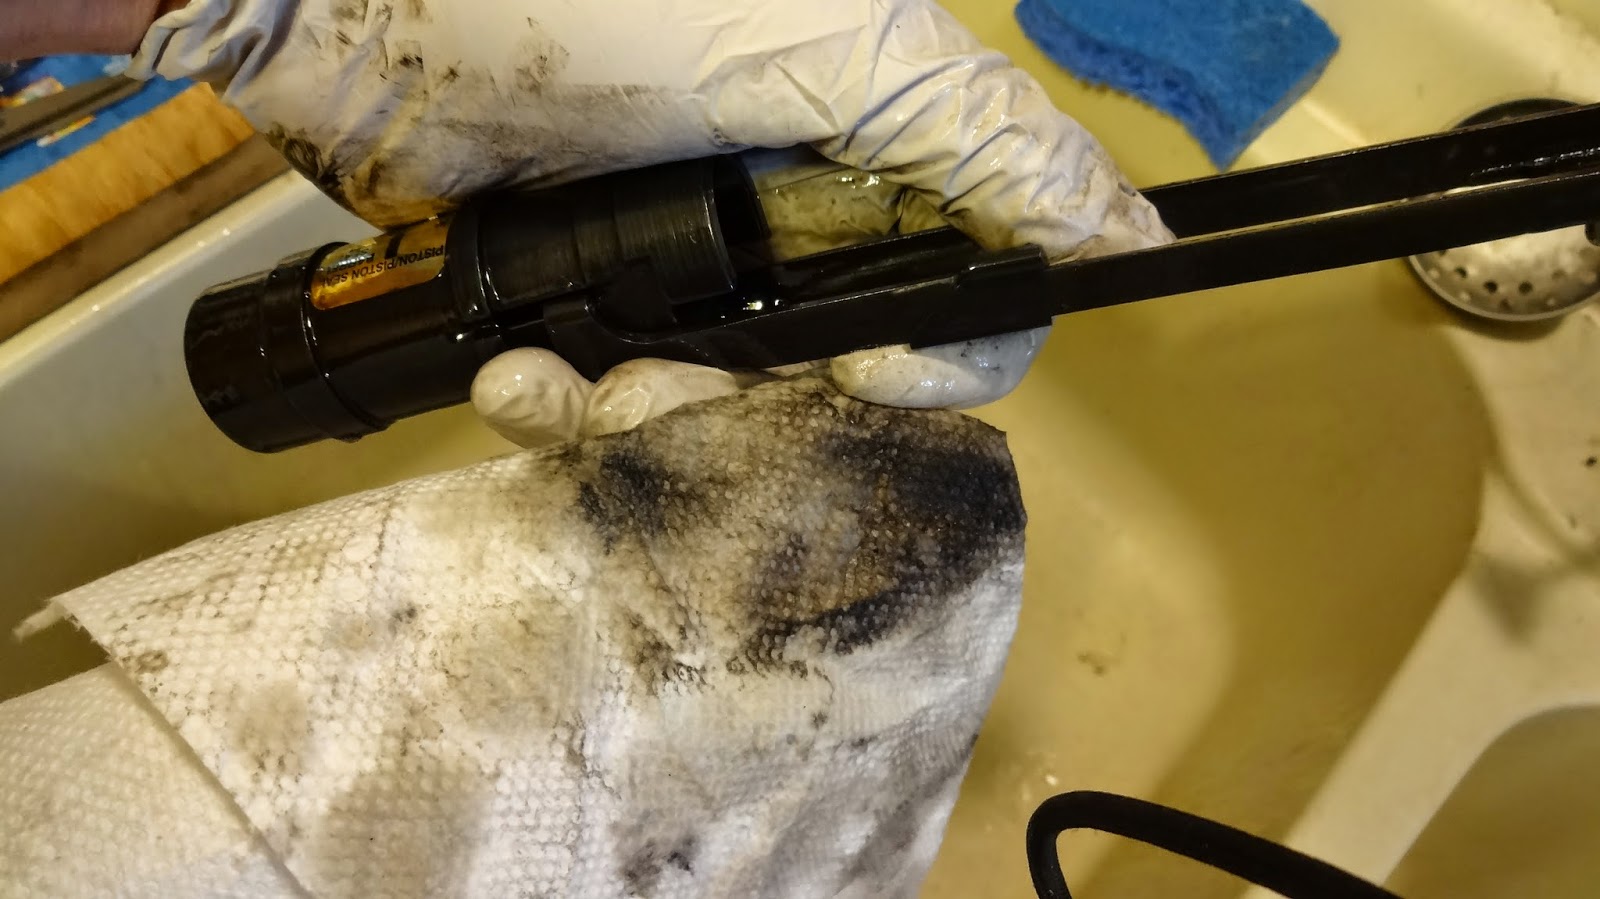
Taking a closer look at that piston ring. Spray this heavily with Break Free, and then wipe it clean. Repeat a couple times if necessary. That part can get dirty. That ring, the carrier, these are the moving parts of the gas system that makes this semi-auto shotgun work properly. It "taps off" high pressure gasses behind your shot load, and uses that gas pressure to operate the action. So, that gas is hot, and has powder combustion by products in it, which will pile up and be dirty...
This part of the mag tube here, this is the dirt from the hot gasses.... Spray that heavily with CLP, soak it, and then wipe off the dirt. Repeat a few times if necessary. You should be able to get this part very clean, which is ideal.
Like so. Nice and clean. Uhh, note to viewers, naturally, this is a DEMONSTRATION, you are not doing this.... But you especially are not doing this in your kitchen. The lighting in my kitchen is WAY better than my garage, so for picture purposes, it photographs way better in the kitchen... so, for you, the viewer, to help you see what's going on, I'm doing this in my kitchen ONE TIME, just to demonstrate.....
Okay, let's wipe down the inside & outside of the receiver, as we see above. This should be nice & clean when you're done...
Here's your bolt. That may be pretty dirty.... Hose that off with CLP, and then start wiping... Keep going to clean cloths, if necessary.... Re-hose it with CLP, if necessary.... You should be able to get this really clean.
This thing in the top will flip up & out, that will help you get it really clean....
This is the front of the bolt. The firing pin hole should be clean & free of obstruction. The firing pin itself should move smoothly & easily, you can operate that with your finger. The spring around the firing pin should be intact. If that spring breaks, the gun won't work, so take a look at that, make sure it looks good. Also, on the left of the bolt, in the above picture, that is the extractor. This has to work, to pull the spent shell out of the chamber. That should be real clean, it should move smooth against the spring. That's important. The extractor should not be broken, or cracked, or have any defects. To spend a minute on that. If your shotgun is working perfectly, get a good impression in your mind of how it looks, and how it works. A bad extractor will cause all kinds of problems.
Moving on, here's our bolt carrier... Hose this down with CLP, and wipe it down. This might be pretty dirty.
Some of these shotguns have this sticker, that shows the orientation of that piston ring we removed earlier. Most do not. So, don't depend on that being there. But if it is, that's kind of nice....
The inside of this sleeve tube on the carrier should be really clean. Spray that down, roll up a cloth or something, get it in there, and spin it around... You'll probably have to do that a few times.... Get it CLEAN in there. This part has to move against the magazine tube, back & forth, on every shot, so you want this to be smooth running.... No binding, no hanging up, no nothing. It should move smooth. So get it clean, and then lightly oil the inside when you're done.
Like so. Nice clean puppy. The inside should be very smooth and nice. If there is scratching, gouges, defects, rust, or other problems in there, your shotgun may not work properly. So pay attention to that.
Taking another look at that piston ring... Make sure that's clean... As you can see, there's plenty of slime on that....
That's better. Now, this might not get bright & shiny.... It's under a lot of heat and pressure. As you keep cleaning though, the black stuff should STOP coming off of it....
Okay, we set the barrel aside before. Let's get the barrel, and get started. If you have choke tubes, this isn't a bad time to inspect, and make sure they are good. I'm using a choke tube wrench there, to remove the tube.
In any firearm, the muzzle is very important to your accuracy! So, use caution here. The way the shot load exits this muzzle is critical to your accuracy, and the perfection of your shot pattern. So use this tool carefully! Hand pressure only! don't mess up the tiny fine threads on this! Take your time, and use caution. This is important!
Also, these tubes tend to get loose during firing, so if you're doing a bunch of shooting, check your tube occasionally to make sure it's tight.
There's our tube. Looks good. Reinstall. Also note, with "overbored" barrels and differences in choke tubes, what was a "Super Full Trap" choke back in the 1970's, is not necessarily what this tube will produce. This tube here, patterns this gun much like a "traditional" full choke shotgun. So, as always, if you are in doubt, pattern your shotgun. Find out what it's really doing.
Okay, the first thing we're going to do is hose down this cup area here, on the barrel. And wipe out the dirt. This will be dirty, as you can see, that was one quick wipe, and there's coal black carbon deposits in there. You're going to have to do this a few times. This is where the gas comes from, to operate the action....
See those 2 holes? That's where the gas comes from. Those holes should be clean. If they are plugged, your shotgun won't work. You can try to clean those out, if necessary, with a paperclip, or a small piece of wire, but work gently, and carefully. You just want to clean stuck dirt out, you don't want to deform or damage anything. The size & shape of those holes is critical. Try blasting & flushing with CLP first, before you get out the paperclip.... You can probably get them cleaned out with just flushing....
I have seen some of these shotguns that, after neglect, had HEAVY carbon build up in this area. If you can't get it, you might want to take the barrel to a gunsmith, and have him/her look at it. If you screw this up, you'll end up buying a new barrel....
You can obviously use any number of cleaning rod type of things, to clean out your barrel. At the moment, I don't have my rod, so I will show a BoreSnake concept here, which actually works fine, and is easy too.
First, as you see above, I cut a slit in the center of a patch, and slide it down the string of a boresnake. Then, I soak the patch with CLP. Soak it!
I also blast down the barrel with the spray can of CLP. Soak it. CLP should be running out the other end.
As always, a firearm, if possible, should be cleaned FROM THE CHAMBER, GOING TOWARDS THE MUZZLE. So, put your string in the chamber, and let it fall out the muzzle. I am going to pull it from chamber to muzzle. Same direction as the shot goes, right? Right. That's what we want.
Pull the snake through 2 or 3 times. Put a fresh patch on it each time, it will come out dirty.
After 3 or 4 times, You should see what we have here. Perfectly clean barrel. Looks fantastic. The pictures are hard to get, of this, but you will know it when you see it. Shiny. Clean. No funny dark spots, streaks, or defects of any kind.
Obviously, you could use a rod, and a brush, and patches, and do the same thing. I put a patch on a brush, soak it, push it through, fresh patch, soak it, push it through.... do that over & over, until you see what you want.
Congrats! There's all your pieces.... All clean. A thing of beauty, isn't it? It is....
Now, how are we gonna get that back together???
Here we go:
Okay, let's get the Receiver, the bolt carrier slide action, the bolt, the O-ring, and the little handle that goes in the bolt. Start by sliding the bolt carrier over the magazine tube, like so. The part that holds the bolt should be towards the receiver.
Like so.
Put the bolt on there. It will drop right on. Don't let it fall off. Now, you can grab the bolt carrier by the forward portion, and push it back into the receiver. You might have to wiggle it around a little, to get it to go in. Don't force anything. It should go. Play around with it gently, until it goes in.
Like so. There it goes....
Once it starts going, slide it all the way back, and it will lock back, just like it usually does, when you are shooting it.
If you want to move it forward, you can press up on the bottom, the shell loading tube gate, and the action will release forward....
It will stop, without going too far forward, since you are NOT pressing that little tab inside with your right hand... As you can see, I put the little handle back in the bolt. You should be able to see the space, where it fits. Just like removal, to install, get it in place, and firmly push it in. It should go. You don't need a hammer or anything....
Now, slide your piston ring over the tube. Make sure it's oriented the right way! Refer back to the pictures of when you took it off, if you have to.
Slide that all the way down.
Now the O-Ring. Again, careful going over those threads! Gently! Take your time! The Trap Range is closed anyways, so relax, and just gently slide that down.
The O-ring should go all the way down, and into the "depression" there in the magazine tube. Like you see above.
Now, we're going to put the barrel back on. Slide the ring over the mag tube, and get the "action" portion lined up with the receiver.... The picture above shows the barrel, ready to be pushed into place. From here, you just wiggle it a little, and push down. Some of these go on real easy, and some are super tight. Patience! Just keep working it down, until the barrel meets the receiver....
Like so. All the way on! Starting to look like a shotgun again!
Now drop the circular capping thing over the end.... Like so.
Now you can slide your forehand back into place....
There it is, all the way down.... Nice!
And... Re Install your barrel nut!
And you're done!
Lucky that was just a demonstration.... Otherwise you might be tired right now!